Briarwood Hollow Curriculum, Charlotte Mason Method, Curriculum, Family-Style Learning, Homeschool, Shared Spines, Special Needs Curriculum

Living Book List

All titles are intended for read-aloud unless noted

You are not assigning every book. Choose 1–2 spines + optional extras.

COMPREHENSION LEVEL GUIDE

Level K–1:

  • picture books, simple nonfiction, heavy visuals

Level 2–3:

  • short chapters, narrative nonfiction, audiobooks ideal

Level 4–5:

  • chapter books, richer vocabulary, discussion-based

Level 6+:

  • longer chapters, primary-source style, biographies

Book Lists

IMPORTANT NOTES

  • Audiobooks are strongly encouraged
  • Picture books are valid at all ages
  • Re-read favorites each cycle
  • One excellent book > many mediocre ones

Living books are meant to be loved, not rushed.

How to use this without overwhelmed

  • Pick 1 history spine + 1 science spine per year
  • Add picture books freely, even for teens
  • Use audiobooks whenever attention or decoding is a barrier
  • Re-read favorites every cycle (that’s a feature, not a failure)

This setup is ideal for children:

  • Dyslexia → oral + audio
  • ADHD → narrative-driven books
  • Autism → predictable themes, repeated exposure
  • Memory challenges → revisiting the same content every 4 years

Briarwood Hollow Curriculum, Curriculum, Family-Style Learning, Learning

Social Studies & Science

What Changes Each Time You Repeat the Cycle

You don’t change the topic — you change expectations.

First Time (Or Younger Kids)

  • Listen to stories
  • Color maps
  • Learn basic vocabulary
  • Oral retelling

Second Time

  • Timelines
  • Short paragraphs
  • Label diagrams
  • Simple research

Third Time

  • Compare civilizations
  • Write summaries
  • Cause/effect
  • Primary sources (simplified)

Fourth Time (Or Teens)

  • Essays
  • Debates
  • Historical analysis
  • Connections to modern world

This works wonderfully with multiple children. Same topic, deeper thinking as you go through each cycle.

Briarwood Hollow Curriculum, Curriculum, Homeschool, Learning

Sensory Specimen Box

What Is a Sensory Specimen Box?

A curated collection of physical items students can handle, observe, compare, and investigate to deepen understanding of academic concepts through sensory input.

Best for:

  • Science & nature study
  • Language arts (descriptive writing, vocabulary)
  • History & geography
  • Special education & neurodivergent learners
  • Inquiry-based and Montessori-style learning

Core Components (All Grade Levels)

Each box typically includes:

  • Specimens (natural or manmade objects)
  • Magnifying glass
  • Observation cards or journal pages
  • Labels or classification cards
  • Optional tools (scale, ruler, tweezers, sound recorder)

Grade-Level Ideas

🟢 K–2: Explore & Describe

Focus: Curiosity, language, basic science

Specimens:

  • Pinecones, feathers, shells
  • Smooth vs. rough stones
  • Fabric swatches
  • Seeds or beans

Activities:

  • Sort by texture, size, or color
  • Describe using 5 senses
  • Draw and label

🔵 3–5: Compare & Classify

Focus: Observation skills, early scientific thinking

Specimens:

  • Leaves from different trees
  • Insect models or exoskeletons
  • Fossils or fossil replicas
  • Minerals

Activities:

  • Create Venn diagrams
  • Measure and record data
  • Write detailed descriptions
  • Introduce taxonomy basics

🟣 6–8: Analyze & Investigate

Focus: Systems, cause/effect, scientific method

Specimens:

  • Igneous vs. sedimentary rocks
  • Animal fur samples (ethically sourced)
  • Soil types
  • Historical artifacts (replicas)

Activities:

  • Hypothesis testing
  • Compare structure & function
  • Cultural or environmental connections
  • Lab-style notebooks

🔴 9–12: Evaluate & Synthesize

Focus: Critical thinking, real-world application

Specimens:

  • Microscopic slides
  • Industrial materials (metals, polymers)
  • Archaeological replicas
  • Forensic samples (fibers, soil)

Activities:

  • Research-based analysis
  • Cross-disciplinary projects
  • Forensic or environmental case studies
  • Technical writing & presentations

Themed Sensory Specimen Boxes (All Ages)

You can rotate boxes by unit:

  • 🌿 Ecosystems Box
  • 🧬 Human Body Box
  • 🏺 Ancient Civilizations Box
  • 🧭 Geography & Cultures Box
  • 🔬 Scientific Tools Box

Adaptations for Sensory Needs

  • Provide gloves or tools for touch-sensitive students
  • Include sound-only or visual-only specimens
  • Offer choice-based exploration
  • Use calming textures or weighted items

Safety & Practical Tips

  • Avoid allergens (nuts, strong scents)
  • Clearly label fragile or sharp items
  • Use sealed containers for biological samples
  • Include a handling guide (with clear instructions)
Briarwood Hollow Curriculum, Curriculum, Family-Style Learning, Homeschool

📍Memory Match

How to Play:

  • Print flashcards in pairs: one with the problem (e.g., 8 ÷ 4 = __) and one with the answer (e.g., 2).
  • Shuffle all cards and place them face down in a grid.
  • Players take turns flipping over two cards.
  • If the problem and answer match, the player keeps the pair and takes another turn.
  • If they do not match, flip the cards back over and the next player takes a turn.

Game End:

  • The game ends when all cards are matched.
  • The player with the most pairs wins.

Memory Match Tips:

  • Start with 6-8 pairs for younger children.
  • Mix addition, subtraction, multiplication, and division for older children.
  • Encourage players to talk through their math thinking while playing.

Flashcards will be shared soon!

Briarwood Hollow Curriculum, Curriculum, Family-Style Learning, Homeschool, Learning

🪖Math Flashcard War

Materials needed:

  • 1 box of flashcards; your choice of addition, subtraction, multiplication, and division (chose one)

How to Play:

  • Shuffle a set of flashcards and divide evenly among players.
  • Each player flips over the top card from their stack at the same time.
  • The first player to correctly answer their own card wins all the flipped cards for that round.
  • If two players answer at the same time, they enter “War!”
  • Each player places three cards face down, then flips the next card and answers. The fastest correct answer wins all the cards.
  • If players tie again, repeat the “War” steps.

Game End:

  • The player with the most cards at the end of the deck wins.

Flashcard War Tips:

  • Start with addition or multiplication only, then mix operations.
  • Set a family rule for how many “Wars” to allow per game to keep it quick.
  • Emphasize sportsmanship, cheering, and learning from mistakes.
Briarwood Hollow Curriculum, Curriculum, Family-Style Learning, Homeschool, Learning

🃏Math Flashcard Speed Rounds Instructions

Materials needed:

  • 1 box of 0-12 flashcards for addition, subtraction, multiplication and division
  • Paper and pencil

How to Play:

  • Set a timer for 30 seconds to 2 minutes based on age.
  • One person calls out flashcard problems quickly.
  • Each player answers aloud as fast as possible.
  • Keep a tally of correct answers for each player.
  • Optional: Repeat 3 rounds and try to beat personal bests.

Speed Round Variations:

  • Addition Only: Quick facts within 10.
  • Mixed Operations: Mix of addition, subtraction, multiplication, and division.
  • Skip Counting: Count by 2s, 5s, 10s, etc. as fast as possible.
  • Dice Speed Round: Roll two dice and add, subtract, or multiply instantly.

Speed Round Tips:

  • Start slow and build up speed.
  • Encourage cheering and clapping for each other.
  • Celebrate personal bests and improvement over time.
Briarwood Hollow Curriculum, Curriculum, Family-Style Learning, Homeschool

🌿 Backyard Habitat

(Bird Feeders, Butterfly Gardens, and Insect Havens)


Phase 1: Plan & Prepare (Days 1–2)

Step 1: Choose Your Habitat Spot

  • Pick a sunny location (6+ hours of sunlight) near some shrubs, trees, or fences for shelter.
  • Ideally, it should be visible from a window so you can watch the wildlife.

Step 2: Observe Your Yard

  • Look for natural windbreaks, water sources, and current wildlife visitors.
  • Note where puddles form (butterflies love damp soil) or areas that get afternoon shade.

Step 3: Measure & Sketch

  • Draw a rough sketch of your backyard.
  • Mark where you can add:
    • Bird feeders
    • Birdbath
    • Native flowers
    • Shrubs or small trees
    • A brush pile or log for shelter
    • Flat rocks for butterflies to sun themselves


Phase 2: Build Bird-Friendly Spaces (Days 3–7)

Step 4: Install Bird Feeders

  • Start simple with 1–2 feeders:
    • Black oil sunflower seeds (attracts many birds)
    • Suet in winter (for insect-eating birds)
  • Hang feeders near trees or shrubs but not too close to give predators hiding spots.

Step 5: Add a Birdbath

  • Use a shallow dish (1–2 inches deep) or purchase a birdbath.
  • Add a rock in the middle for perching.
  • Clean and refill with fresh water every 2–3 days.

Step 6: Plant or Add Shelter

  • Native shrubs, small trees, or even a brush pile provide cover.
  • Stack sticks and fallen branches in a small corner for shelter.


Phase 3: Create a Butterfly Garden (Weeks 2–4)

Step 7: Plant Nectar Flowers

  • Choose native, pollinator-friendly plants that bloom in different seasonsl.
  • Examples:
    • Spring: Milkweed, Columbine
    • Summer: Coneflower, Bee Balm, Black-Eyed Susan
    • Fall: Goldenrod, Asters
  • Planted in clusters of the same type to attract butterflies.

Step 8: Add Host Plants

  • Butterflies lay eggs on specific plants.
  • Example host plants:
    • Milkweed (Monarchs)
    • Dill, fennel, parsley (Swallowtails)
    • Violets (Fritillaries)

Step 9: Create a Butterfly Puddle Spot

  • Fill a shallow dish with moist sand or soil.
  • Add flat rocks for perching.
  • Keep it damp to attract butterflies looking for minerals.


Phase 4: Insect & Small Critter Havens (Week 4+)

Step 10: Build a Simple Bee Hotel

  • Bundle hollow plant stems, bamboo pieces, or paper straws in a waterproof container.
  • Hang in a sunny, sheltered spot.
  • Leave some bare soil nearby for ground-nesting bees.

Step 11: Leave the Leaves

  • In fall, let a layer of leaves remain to provide winter shelter for insects, caterpillars, and overwintering butterflies.


Phase 5: Maintenance & Enjoyment (Ongoing)

Step 12: Keep Feeders & Baths Clean

  • Clean bird feeders every 2 weeks with warm, soapy water.
  • Scrub birdbaths regularly to prevent algae and mosquito larvae.

Step 13: Minimize Pesticides

  • Avoid chemicals that can harm birds, bees, and butterflies.
  • If pests are a problem, try hand-picking or using natural deterrents like neem oil.

Step 14: Observe & Adjust

  • Keep a simple nature journal to track bird and butterfly visits.
  • Adjust your plants and feeders based on what visitors you want to attract.


Optional Hands-On Add-Ons:

  • Build a small brush pile for chipmunks or lizards.
  • Construct a DIY birdhouse suited to local species.
  • Make seed bombs with native wildflower seeds to scatter.
Briarwood Hollow Curriculum, Curriculum, Family-Style Learning

🌿Daily Nature Walks with Guided Observation Prompts

📅 Frequency: 4 days per week

Duration: 15–45 minutes (flexible by age)


🌳 Step 1: Prepare Nature Walk Materials

Each person should have:

  • Small blank nature journal or notebook
  • Pencil (colored pencils or watercolors optional)
  • Optional: Magnifying glass, field guides, camera
  • For young children: Printable nature scavenger hunts or picture prompts


🌱 Step 2: Set the Intention for the Walk

Before leaving, gather the group and briefly state:

  • “Today we’re going to walk slowly, use all our senses, and observe carefully. We’re going to look for things we may have walked past before.”

Optional:
Read a short nature poem, folk tale, or quote to set a peaceful, attentive mindset.


👣 Step 3: Walk with Purposeful Slowness

  • Move at a slow, mindful pace.
  • Allow children to stop, crouch, look closely.
  • Adults should model curiosity, not rush.

You may:

  • Follow a familiar path or explore a new one.
  • Occasionally pause and sit for a few minutes to simply listen.


🌸 Step 4: Use Guided Observation Prompts

Choose one or two prompts per walk to focus attention. Rotate through senses and categories across the week.

Example Prompts:

SIGHT:

  • Find something with more than one color.
  • Notice a plant growing in a crack or unusual place.
  • Can you find something you’ve never seen here before?

SOUND:

  • How many different bird songs can you hear?
  • What does the wind sound like today?
  • Can you hear insects? Leaves? Running water?

TOUCH:

  • What does the bark feel like on different trees?
  • Is the air warm, cool, damp, dry?

SMELL:

  • Can you find something with a strong scent? (flowers, soil, leaves)

PATTERNS:

  • Look for spirals, symmetry, or repeating shapes.

SEASONALITY:

  • What signs of the season do you see right now?
  • Compare today’s walk to last week’s—what has changed?

ANIMAL LIFE:

  • Follow an insect. Where does it go?
  • Can you spot any animal homes, tracks, or signs?

CONNECTION:

  • How does this place feel today?
  • Do you notice something that makes you feel peaceful or curious?


✏️ Step 5: Journal the Experience

Immediately after the walk:

  • Sit together and draw or write in nature journals.
  • Younger children: Draw what they saw and dictate a sentence.
  • Elementary: Draw, label, and write a few sentences using sentence stems:
    • “I noticed…”
    • “I wondered…”
    • “I think this might be…”
  • Older students: Write detailed entries including sketches, species names (if known), or poetic descriptions.


📚 Step 6: Optional Extension

  • Use a field guide to identify plants, insects, or birds noticed on the walk.
  • Add new discoveries to a personal or family nature log.
  • Create seasonal comparison pages.
  • Map your walking route and note where specific observations were made.


🌞 Step 7: Build the Habit Over Time

  • Encourage daily consistency, even if some days the walk is very short.
  • Over seasons and years, children develop a deep ecological literacy and emotional connection to the land.


🌿 Tips for Success:

  • Be comfortable with silence. Let children lead sometimes.
  • Stay flexible. Some days will be high-energy explorations; others will be quiet and slow.
  • Praise attentiveness, not speed. Reward the depth of noticing.

Briarwood Hollow Curriculum, Curriculum

Weekly Schedule & Rhythm

Weekly Overview

Day 1

  • Language Arts, Handwriting, Arithmetic
  • Art & Artist Study
  • World History
  • Science

Day 2

  • Language Arts, Phonics, Arithmetic
  • Music & Composer Study
  • American History
  • Science/Nature Study

Day 3

  • Literature, Poetry, Mythology & Folklore
  • Handicrafts
  • Native American History & Culture
  • Geography & Culture

Day 4

  • Language Arts, Logic & Philosophy, Arithmetic
  • World Religions
  • Government & Civics
  • Elective Studies


Daily Rhythm

Morning Block (9:00-10:30 AM)

  • Core Lessons: Language Arts, Arithmetic, Literature
  • 10-Minute Breaks

Middle Block (10:40 AM – 12:00 PM)

  • History, Science, Geography, Logic/Philosophy, World Religions
  • 10-Minute Breaks

Lunch Break (12:00-1:00 PM)

Afternoon Block (1:00-2:30 PM)

  • Art, Music, Nature Study, Handicrafts, Electives
  • Hands-on Group Activities

Optional Quiet Reading or Free Exploration: 2:30-3:00 PM

Daily Rhythm Breakdown

Morning Gathering (30 min)

  • Morning song, poetry, family read-aloud, daily calendar, group nature journal

10-min Break

Lesson Block 1 (45 min)

  • Core Subject (Language Arts, Arithmetic)

10-min Break

Lesson Block 2 (45 min)

  • Secondary Subject (Science, History, Geography, etc.)

10-min Break

Lesson Block 3 (45 min)

  • Literature, Mythology, or World Religions

Lunch Break (60 min)

Lesson Block 4 (45 min)

  • Electives, Art, Handicrafts, Music, or Group Projects

Closing Circle (15 min)

  • Reflection, review, and read-aloud time

Note: Adjust timing for younger children and special needs learners as needed.

Briarwood Hollow Curriculum, Curriculum, Family-Style Learning, Homeschool, Learning

🌱 Gardening & Yard Planning Family-Style Math Lesson

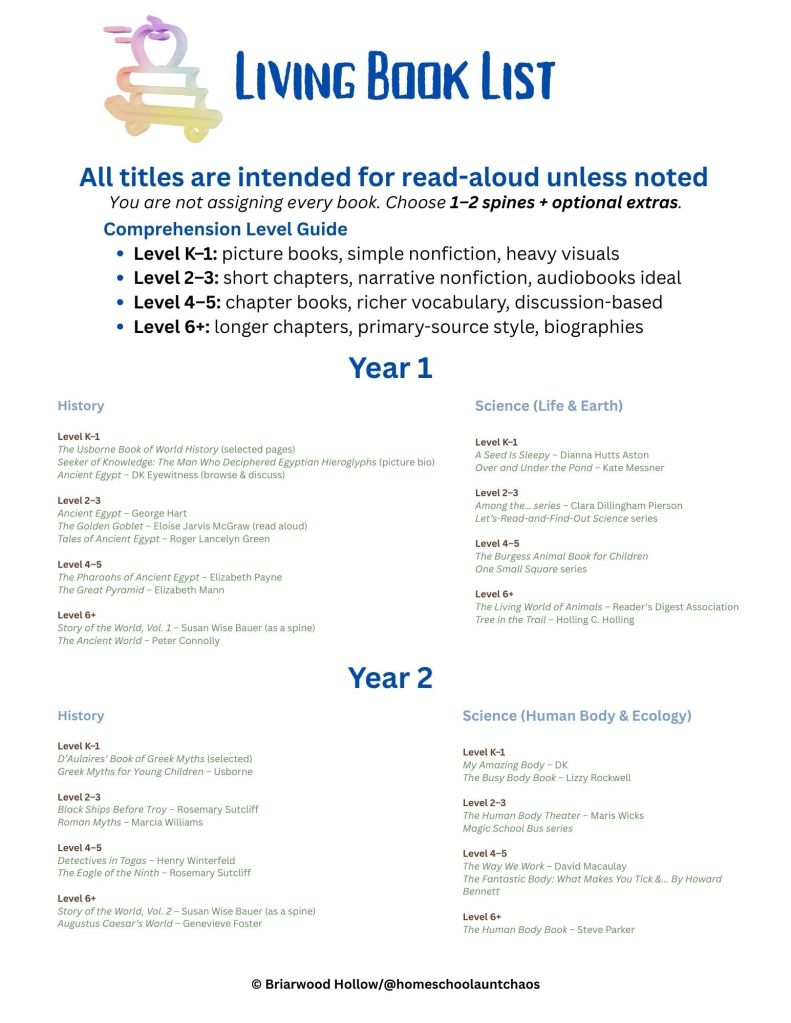
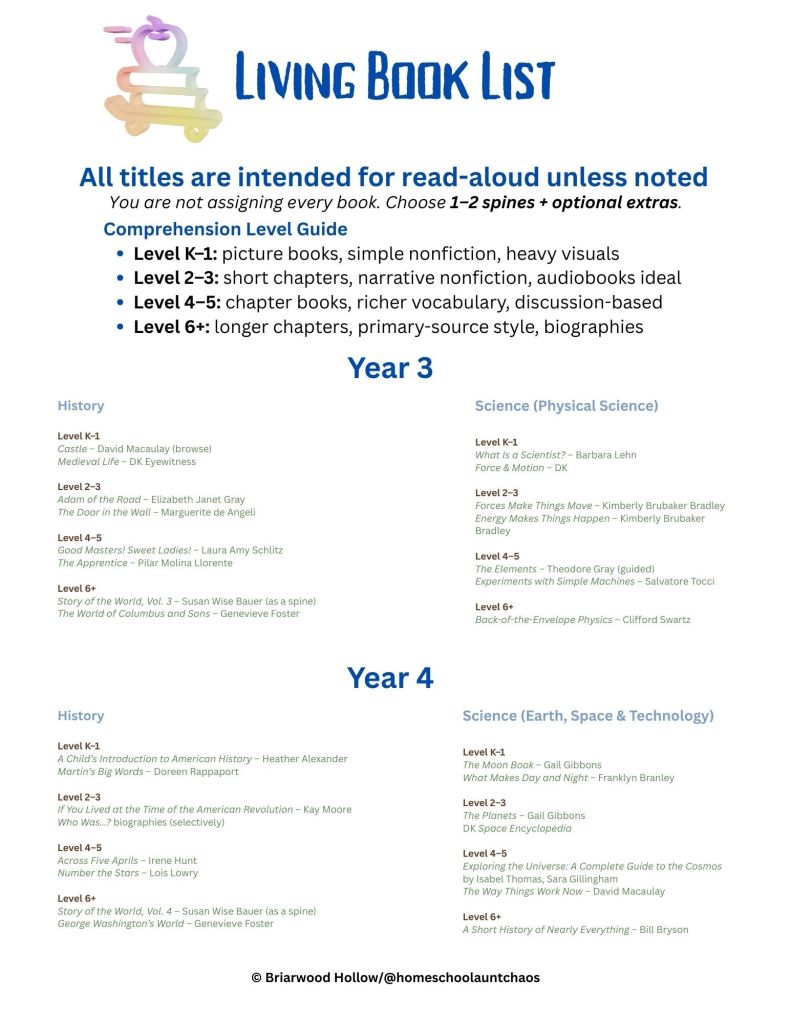
Focus: Geometry | Area | Perimeter | Multiplication | Real-Life Design


📋 Preparation (Before the Lesson)

  1. Choose a Space:
    Backyard, front yard, a raised bed, or even a large planter box.
  2. Gather Materials:
    • Graph paper or large poster board
    • Ruler, measuring tape, string
    • Markers or crayons
    • Calculators for older kids
    • Optional: Gardening catalogs or seed packets for extra fun
  3. Assign Roles:
    • Youngest: Counting seeds, measuring with string, drawing simple shapes
    • Elementary: Measuring lengths, calculating area, estimating spacing
    • Middle/High School: Full garden layout planning, scaling maps, advanced area/perimeter calculations


🪴 Step-By-Step Family-Style Lesson

🔹 Step 1: Measuring the Garden Space

  • Walk the garden space together with a measuring tape or string.
  • Measure:
    • Length and width of the whole garden (older kids)
    • Count steps or use string lengths for younger kids
  • Record measurements.

💡 Math Talk:

How many feet long is our garden?

How wide?

How would we find the area?

(Length × Width = Area)


🔹 Step 2: Mapping the Garden to Scale

  • On graph paper:
    • Older kids: Draw a scaled garden map (Example: 1 square = 1 foot)
    • Younger kids: Draw the garden and place plants with stickers or stamps
  • Discuss perimeter:
    “How much fencing would we need to go all the way around?”

💡 Family Tip:

Let everyone design their own section of the garden.


🔹 Step 3: Planning Plant Spacing

  • Review seed packets to see spacing needs.
  • Younger kids: Count how many plants can fit in one row.
  • Elementary kids: Calculate how many rows fit in the garden space.
  • Older kids: Multiply to find the total number of plants per bed.

💡 Example:

“Tomato plants need 2 feet between them. How many can we fit in a 12-foot row?”


🔹 Step 4: Calculate Planting Quantities

  • Youngest: Count seeds or starter plants.
  • Elementary: Multiply the number of rows by plants per row.
  • Older kids: Calculate space required per plant, how many can fit in multiple beds, or in a specific area.


🔹 Step 5: Optional Budgeting

  • Look up the price of seeds, soil, and fencing.
  • Older kids can:
    • Calculate total garden cost.
    • Compare prices from different stores.

💡 Family Challenge:

“How could we build this garden on a $50 budget? What can we adjust?”


🔹 Step 6: Build or Prepare the Garden Together

  • Measure again in real life while building.
  • Check if your drawn map matches your real measurements.

💡 Preschoolers:

Can help with digging, watering, and placing markers.


🔹 Step 7: Ongoing Math Extensions

  • Track plant growth with a ruler over weeks.
  • Graph weekly growth rates.
  • Calculate harvest yields per square foot.
  • Budget for future expansions based on this year’s costs.


🌿 Quick Adaptations for Special Needs

  • Visual Tools: Color-coded string, seed spacing diagrams, large print measuring charts.
  • Hands-On Learners: Use bean bags, rocks, or play coins to physically represent spacing and costs.
  • Movement Breaks: Measuring with giant steps, running to collect garden tools between tasks.


🌟 Bonus Family Challenges

  • Design a square-foot garden with exact 12″x12″ sections.
  • Create a companion planting plan using research (what grows well together).
  • Plan a pollinator garden with measured flower spacing.

Family Garden Math Worksheets