
Tag: Homeschool
A History of the United States
The World’s Story Volumes

The World’s Story: A History of the World in Story Volume 1
The World’s Story: A History of the World in Story Volume 2
The World’s Story: A History of the World in Story Volume 3
The World’s Story: A History of the World in Story Volume 4
The World’s Story: A History of the World in Story Volume 5
The World’s Story: A History of the World in Story Volume 6
The World’s Story: A History of the World in Story Volume 7
The World’s Story: A History of the World in Story Volume 8
The World’s Story: A History of the World in Story Volume 9
The World’s Story: A History of the World in Story Volume 10
The World’s Story: A History of the World in Story Volume 11
The World’s Story: A History of the World in Story Volume 12
The World’s Story: A History of the World in Story Volume 13
The World’s Story: A History of the World in Story Volume 14
The World’s Story: A History of the World in Story Volume 15
The Golden Rule Series
Carpenter’s Geographical Readers

Frank George Carpenter’s Geographical Readers and more…
Geographical Readers:
Travels Through Asia with the Children
Travels Through North America with the Children
Travels Through South American with the Children
Australia – Our Colonies, and Other Islands of the Sea
Commerce and Industry Readers:
South America, Social, Industrial, and Political
Around the World with the Children
Journey Club Travels:
World Travels:
Alaska, Our Northern Wonderland
The Tail of the Hemisphere, Chile and Argentina
Egypt, The Sudan, Kenya Colony
Australia, New Zealand and Some Islands of the South Seas
The Alps, the Danube and the Near East
Along the Paraná and the Amazon, Paraguay, Uruguay, Brazil
Through the Philippines and Hawaii
Lands of the Andes and the Desert
The British Isles and the Baltic States
New Geographical Readers:
There are a few more I have yet to find.
Sanders’ Union Readers

Sanders’ Union Pictorial Primer
Sanders’ Union Reader: Number One
Sanders’ Union Reader: Number Two
Sanders’ Union Reader: Number Three
Sanders’ Union Reader: Number Four
Sanders’ Union Reader: Number Five
Sanders’ Union Reader: Number Six
Sanders’ School Reader: First Book
Sanders’ School Reader: Second Book
Sanders’ School Reader: Third Book
Copywork and Handwriting
✍️ Handwriting
Handwriting is defined as the skill of forming letters and numbers correctly, legibly, and fluently. It includes print (manuscript) and cursive styles and is taught through structured practice.
Purpose:
- Develop fine motor control.
- Build the physical ability to write.
- Lay the foundation for copywork and written expression.
📖 Copywork
Copywork is defined as the intentional practice of copying well-written sentences, poetry, Scripture, or prose from a model onto paper, focusing on accuracy, penmanship, spelling, punctuation, and exposure to quality language.
Purpose:
- Train the hand and the eye.
- Internalize excellent language patterns.
- Reinforce spelling and grammar in context.
- Develop attention to detail and neatness.
Copywork is not busywork—it is gentle yet powerful language training.
🗣️ Dictation
Dictation is defined as the practice of writing a previously studied passage from memory as it is read aloud by the teacher, testing the student’s ability to recall correct spelling, punctuation, capitalization, and sentence structure.
Purpose:
- Reinforce grammar, mechanics, and spelling through real literature.
- Train attention, auditory memory, and listening skills.
- Transition from copywork to original composition.
Progression:
- Studied dictation (the child studies the passage first).
- Prepared dictation (discussed but not memorized).
- Unprepared dictation (for advanced students only).
🌱 Preschool–Kindergarten
Goal: Build fine motor strength, letter recognition, and pre-writing skills.
🔹 Focus:
- Tracing lines and shapes.
- Uppercase letter formation.
- Name writing.
🔹 Step-by-Step:
- Finger Tracing: Trace large letters in sand, salt trays, or on textured cards.
- Line Practice: Use worksheets or draw straight, curved, and zigzag lines.
- Letter Tracing: Use dotted-line uppercase letters on wide-ruled paper.
- Name Practice: Child traces then copies their name in print.
🔹 Adaptations:
- Motor delay: Use chunky crayons or pencil grips.
- Dysgraphia: Start with vertical surfaces (chalkboard, easel).
- Attention issues: Keep lessons under 5 minutes and use timers or songs.
- Visual tracking: Use highlighted tracing lines and bold start/stop dots.
📘 Grades 1–3
Goal: Master manuscript print, introduce cursive, and begin simple copywork.
🔹 Focus:
- Print fluency (1st–2nd), Cursive introduction (2nd–3rd).
- Daily short copywork (1–3 sentences).
🔹 Step-by-Step:
- Print Practice: Copy one letter/word at a time using model lines above.
- Cursive Introduction (2nd+): Learn one letter at a time with directional arrows.
- Copywork: Start with short proverbs, lines from readers, or Scripture (if desired).
- Self-Check: Encourage comparison with the model—1–2 improvements.
🔹 Adaptations:
- Slow processing: Let the child say letters aloud as they write.
- ADHD: Use finger tracing before writing and incorporate movement breaks.
- Autism: Use high-interest sentences and scripts from stories.
- Dyslexia: Use color-coded strokes for letters (e.g., upstrokes in red, downstrokes in blue).
📗 Grades 4–6
Goal: Solidify cursive, increase copywork length, and transition into dictation.
🔹 Focus:
- Copy 1–2 paragraphs per week.
- Begin transcription (reading from one place, writing in another).
- Light dictation (single sentence).
🔹 Step-by-Step:
- Cursive Mastery: Daily copywork in cursive from living books.
- Paragraph Copywork: Focus on neatness, punctuation, and correct spelling.
- Transcription Practice: Child copies from book to notebook.
- Simple Dictation: Parents read short sentences aloud; a child writes from memory.
🔹 Adaptations:
- Executive function challenges: Break tasks into numbered steps.
- Memory issues: Use close exercises for copywork (missing words filled in).
- Hand fatigue: Allow typing or use voice-to-text with follow-up editing practice.
📙 Grades 7–9
Goal: Independent copywork and structured dictation with grammar and style awareness.
🔹 Focus:
- 1–2 dictation passages per week.
- Copywork becomes a study of language, punctuation, and style.
🔹 Step-by-Step:
- Pre-Dictation Study: Read and orally discuss the passage.
- Visual Copy: Copy as neatly as possible; correct errors.
- Dictation Day: A parent reads the passage once; the child writes it from memory.
- Editing: Compare and correct using colored pens.
🔹 Adaptations:
- Working memory issues: Break dictation into chunks.
- Dyslexia: Use audio support or visual chunking.
- Autism: Let the child pick copywork from favorite authors or books.
📕 Grades 10–12
Goal: Apply copywork and dictation toward composition and rhetorical writing.
🔹 Focus:
- Literary and rhetorical style analysis.
- Advanced dictation with longer passages.
- Imitation exercises (writing in the style of an author).
🔹 Step-by-Step:
- Literary Copywork: Choose beautiful or meaningful passages weekly.
- Advanced Dictation: Use full paragraphs with punctuation and dialogue.
- Imitation Exercises: Rewrite a passage in the same voice but new context.
- Written Narrations: Transition into essays and reflections.
🔹 Adaptations:
- Processing disorders: Provide audio versions and typed models.
- Handwriting pain: Use computers but still check for grammar and syntax.
- Executive dysfunction: Use checklists and visual reminders of steps.
📅 Weekly Progression (Grades 1–6)
Goal: Build fluent, legible handwriting, internalize strong language patterns, and gently prepare for original writing through daily exposure to excellent literature and careful attention.
Day 1 – Copywork – Guided
- Read aloud a short passage (1–2 sentences for younger, 3–5 for older).
- Discuss punctuation, capitals, any tricky words.
- Child copies the passage carefully in print or cursive.
- Adaptations:
- Highlight tricky words ahead of time.
- Provide tracing versions for struggling writers.
- Allow choice of pencil or marker for sensory needs.
Day 2 – Copywork – Independent + Oral Dictation
- Review and re-read Monday’s passage.
- Child copies independently.
- Then do oral dictation: dictate one phrase and have the student repeat aloud (not write).
- Adaptations:
- Use a visual model on the desk.
- Read one word at a time if needed.
- Allow movement breaks between lines.
Day 3 – Copywork or Tracing + Mechanics Focus
- Provide a new short passage (or repeat an old one).
- Focus on one skill: capital letters, spacing, punctuation, or correct letter formation.
- Adaptations:
- Use sand trays, whiteboards, or textured letters for sensory input.
- For dysgraphia: dictate the sentence and let the child type it instead.
Day 4 – Prepared Dictation or Picture Narration
- Re-read a well-known passage from the week.
- Dictate one sentence slowly, word by word. Child writes from memory.
- Younger or struggling children can draw a picture of the sentence or story and explain it orally.
- Adaptations:
- Break up the sentence into 2–3 word chunks.
- Allow use of phonetic spelling for early writers.
- Use voice-to-text if writing is too difficult.
📅 Weekly Progression (Grades 7–12)
Goal: Transition from teacher-directed copywork and dictation into independent mastery of language, grammar, spelling, and style—ultimately preparing the student for original composition and rhetorical writing.
Day 1 – Literary Study + Copywork
- Read aloud or silently a selected passage (from literature, speeches, historical texts).
- Discuss style, vocabulary, punctuation.
- Copy 1–2 paragraphs in best handwriting or type.
- Optional adaptation:
- Use audio recordings or color-coded printouts for dyslexia or visual tracking issues.
Day 2 – Prepared Dictation
- Review the same passage.
- Talk through punctuation, tricky spellings, grammar points.
- Dictate the passage slowly (1 clause at a time), child writes from memory.
- Adaptation:
- Use shorter chunks, allow re-reading of each phrase for working memory support.
Day 3 – Editing + Imitation Practice
- Child compares their dictation to the model.
- Use colored pens to fix spelling, punctuation, or formatting errors.
- Optional:
- Imitation exercise — write a new paragraph in the same style or tone (e.g., rewrite from another character’s point of view).
- Adaptation:
- Offer scaffolded models (e.g., sentence frames) for autistic or ADHD learners.
Day 4 – Written Narration or Freewriting
Choose from:
- Respond to the copywork passage.
- Narrate a history reading.
- Write a short reflective or persuasive paragraph.
- Focus on ideas and clarity more than mechanics.
- Adaptation:
- Allow use of typing or dictation software for those with handwriting fatigue or dysgraphia.
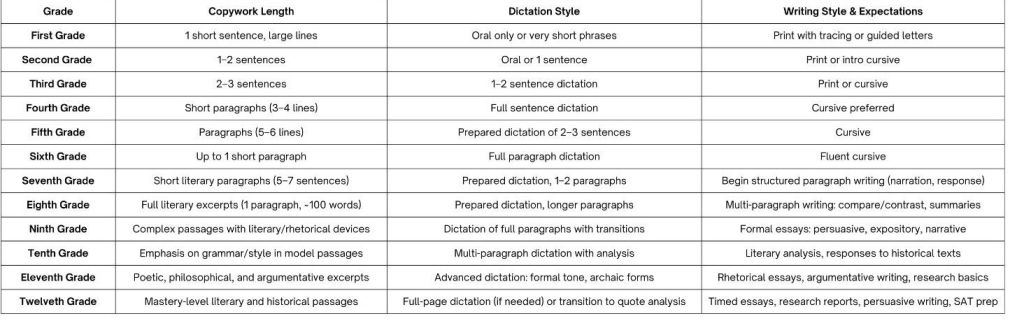
✨ Grade-by-Grade Expectations (Grades 1-12)
Nature Discovery Basket
A Nature Discovery Basket is a simple, powerful tool for young learners—especially in Charlotte Mason and nature-based homeschools. It’s essentially a curated basket filled with items from the natural world (or related to it) that invite curiosity, observation, and gentle exploration. It encourages hands-on discovery, storytelling, sketching, and imaginative play—ideal for special needs learners who benefit from tactile, visual, and sensory-rich environments.
🌿 What’s in a Nature Discovery Basket?
It can include:
- Natural objects (pinecones, feathers, rocks, shells)
- Magnifying glass
- Nature journal or sketchpad
- Small field guides or picture cards
- Measuring tape or ruler
- Seasonal treasures (e.g., autumn leaves, spring flowers)
- Specimen jars (empty and clean)
- Tweezers or tongs for handling delicate items
- Nature poetry or a living book excerpt
🪵 Step-by-Step: How to Create a Nature Discovery Basket
Step 1: Choose Your Basket
- Use a shallow, open basket or wooden tray.
- It should be easy for children to carry and rummage through.
- Lined or divided baskets help organize delicate items.
Step 2: Set a Theme (Optional)
- Go on a nature walk with your child and collect objects (ethically and safely—nothing living, rare, or harmful).
- Example: “Winter Wonders” with pine needles, birch bark, frost crystals in photos, and evergreen cones.
Step 3: Gather Nature Items
- Go on a nature walk with your child and collect objects (ethically and safely—nothing living, rare, or harmful).
- Collect a mix of textures, colors, and sizes.
- Ideas:
- Smooth stones
- Dried flower heads
- Acorns and oak leaves
- Bird feathers (cleaned)
- Sand in a jar
- Lichen-covered sticks
Tip: Rotate objects seasonally or when interest fades.
Step 4: Add Observation Tools
- Include:
- Magnifying glass (plastic if breakable)
- Measuring tape or ruler
- Tweezers or tongs
- Specimen jars or small clear boxes
These tools encourage scientific observation in a gentle, non-pressured way.
Step 5: Include Reading & Drawing Materials
- Add:
- A small nature notebook or sketchpad with colored pencils.
- A tiny laminated field guide or nature picture cards (download and print free ones).
- A short poem or quote about nature tucked into an envelope.
For pre-writers or special needs learners, include:
- Tracing cards of leaves or animals
- Simple “I Spy” visual lists
- Tactile textures (bark rubbings, cloth swatches with natural patterns)
Step 6: Introduce the Basket
- Set aside quiet time 1–2x/week.
- Say something like: “Let’s explore what’s in the Nature Basket today!”
- Let the child lead. Sit with them, observe, ask open-ended questions:
- What do you notice about this rock?
- How does this feather feel?
- Which item is the heaviest?
Step 7: Rotate and Refresh
- Every 2–4 weeks, remove tired items and add new discoveries.
- If interest dips, switch themes or add something new to rekindle curiosity.
🔍 Bonus: Nature Discovery Basket Themes
- Forest Finds – Acorns, moss, sticks, bark, forest leaves, owl feather (if found ethically)
- Beach Treasures – Shells, sand, driftwood, sea glass, crab shell
- Garden Goodies – Seed pods, dried herbs, worm castings, petals
- Nighttime Nature – Owl pellets, bat photo cards, dark rocks, night sky chart
- Bug Basket – Insect specimens, bug jar, magnifier, ant photos, butterfly wing diagram
This simple basket opens a wide door to wonder, science, language, and calm focus—especially powerful for learners who thrive on sensory, visual, or tactile experiences. Let it be a quiet invitation to engage with the world, not a demand. Nature will do the rest. 🌱
Story Stones
🪨 What is Story Stones?
Story Stones are small stones or pebbles that have images, symbols, or words painted or drawn on them, used as prompts to spark storytelling, imagination, and language development. They’re especially powerful for early learners, special needs children (including those with autism or speech delays), and as a Charlotte Mason-style oral narration tool. Each stone represents a character, setting, object, or action.
🧠 How to Use Story Stones
- Storytelling: Pull 3–5 stones and make up a story with them.
- Narration Practice: Use them as prompts after a read-aloud.
- Sensory bins: Add them to sand or rice bins for themed play.
- Writing Prompts (for older kids): Draw stones to inspire creative writing.
🎨 What You’ll Need
- Smooth stones (river rocks, flat pebbles)
- Acrylic paint or paint pens (or permanent markers)
- Clear sealant (Mod Podge, spray sealer, or acrylic varnish)
- Optional: Stickers, printed images, decoupage glue
- Paper towels or newspaper to protect your work surface
🪨 Step-by-Step Instructions to Create Story Stones
Step 1: Gather & Clean the Stones
- Collect flat, smooth stones (from nature or buy at craft stores).
- Wash them with warm soapy water to remove dirt.
- Let them dry completely—this ensures paint sticks well.
Step 2: Plan Your Themes
Decide what type of stories you want to spark. Keep it simple and visual.
- People/Characters: boy, girl, dragon, cat, knight
- Places/Settings: house, forest, castle, ocean
- Objects: key, book, crown, ball
- Actions: running, flying, sleeping
- Weather/Nature: sun, cloud, moon, tree, river
💡 Tip: Start with 6–12 stones in a theme for young children.
Step 3: Decorate the Stones
Choose your decoration method:
- Paint: Use acrylics or paint pens to draw your images.
- Stickers or cutouts: Glue images from magazines or printed icons with Mod Podge.
- Sharpies: Great for outlining or adding simple line art.
Let dry thoroughly between layers.
Step 4: Seal the Stones
To protect your work:
- Apply a layer of Mod Podge or spray sealer.
- Let it dry completely before handling.
This makes them last longer—especially for little hands!
Step 5: Store and Play
- Store in a cloth bag, small basket, or labeled tin.
- Introduce only a few at a time to avoid overload.
🧩 Adaptations for Special Needs
- Use realistic images or photographs if abstract art is confusing.
- Add text labels for early readers or dyslexic learners.
- Use tactile materials (felt, foam stickers) for sensory engagement.
- Use story sequence mats to help organize beginning–middle–end.
Good Deeds Tree
🌳 What Is a Good Deeds Tree?
It’s a paper (or felt, cardboard, wall-mounted, or 3D) tree with removable leaves, fruit, blossoms, or ornaments. Each time a child does a good deed—helping a sibling, cleaning up without being asked, sharing, using kind words—they add a leaf or item to the tree. Over time, the tree “grows” full with good deeds!
✂️ Step-by-Step Instructions to Create a Good Deeds Tree
🎨 Option 1: Wall-Mounted Paper Tree (Great for home or classroom walls)
🧰 Materials:
- Large sheet of poster board or kraft paper
- Construction paper (green, red, yellow, etc.)
- Scissors
- Glue or sticky tack
- Tape
- Markers or crayons
- Optional: laminator or clear tape for durability
🪴 Instructions:
- Draw and Cut Out the Tree Trunk and Branches
- Use brown construction paper or draw directly on a poster/kraft paper.
- Make the trunk sturdy and branches wide enough to hold many “good deed leaves.”
- Mount the Tree on a Wall
- Tape or pin the tree trunk and branches to a central wall where it’s easy to reach.
- Prepare the Leaves (or Fruit, Flowers, Stars, etc.)
- Cut out 30–100+ leaves or shapes (green for spring, yellow/red for fall, hearts for Valentine’s, etc.).
- Keep them in a labeled envelope or basket near the tree.
- Label Each Leaf with a Good Deed
- As children perform kind or helpful actions, write their name and deed on a leaf.
- Optional: Reward the class/family with a group celebration or special activity.
- Celebrate Growth
- At the end of the week/month/term, read all the good deeds aloud.
- Optional: Reward the class/family with a group celebration or special activity.
🌳 Option 2: Tabletop 3D Tree (Crafty + Tactile for younger children)
🧰 Materials:
- Cardboard or foam board
- Hot glue gun
- Paint or markers
- Mini clothespins or Velcro
- Construction paper leaves
- Small basket
🪴 Instructions:
- Build a 3D Tree Base
- Cut two identical tree shapes from cardboard.
- Slice one from the bottom to the middle, the other from top to middle, and slot them together to stand up.
- Paint or Decorate the Tree
- Use brown, green, or seasonal colors. Let kids help decorate!
- Cut and Store Leaves
- Prepare leaves with a hole punched at the top for hanging, or just let them be clipped with clothespins.
- Add Good Deeds
- As kids do good deeds, they write (or dictate) them on leaves and hang them on the tree.
💡 Optional Variations:
- Use seasonal decorations: hearts in February, flowers in spring, apples in fall, snowflakes in winter.
- Turn it into a “Fruit of the Spirit” Tree (for religious use) or a Character Tree (for secular use).
- Let kids decorate their own leaves as a mindfulness or art activity.
- Create a “Forest of Kindness” if working with multiple children.
🧠 Special Needs Adaptations:
- Use visual symbols (smile face, helping hand, broom, hug) for non-readers or memory-impaired learners.
- Provide a “Good Deed Starter Chart” to help kids brainstorm ideas.
- Allow verbal good deed reports for those with writing challenges and write for them.
- For autistic or ADHD learners, praise immediately and tangibly by letting them place a leaf the moment the deed is done.
🎉 Why It Works
- Visual Progress: Children see the impact of their actions.
- Positive Reinforcement: Encourages intrinsic motivation without relying solely on external rewards.
- Community Focus: Helps foster a shared sense of kindness and belonging.
